
Manufacturers pour an enormous amount of time and money into the design of their electric mountain bikes. A huge portion of that investment goes towards mountain bike geometry.
The design, angles and positioning of bike components all make a difference to the riding experience. An e-MTB with poor geometry can be miserable to ride, but if it’s done right, it can be an utter joy.
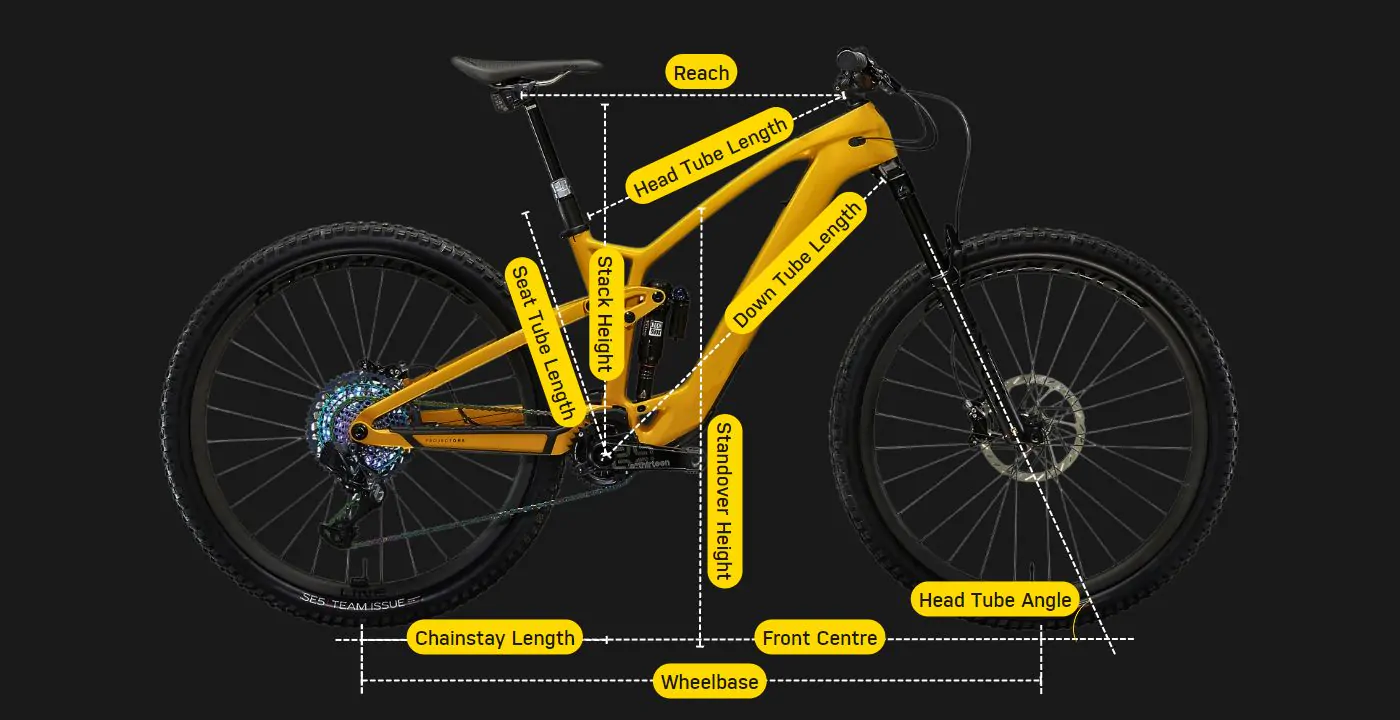
So, what exactly is mountain bike geometry? In our MTB geometry guide, we’ll leave no stone unturned, to ensure that you leave reading this as a mountain bike geometry aficionado…
Which Factors Come Together for Mountain Bike Geometry?
Seat Tube Length

The seat tube length is a key aspect of mountain bike geometry, which dictates who can ride a certain e-MTB. The seat tube length offers a minimum and maximum height where the seat can go – this is an important consideration for your height – if the seat doesn’t go high enough for tall riders, they won’t be able to ride comfortably.
A certain seat tube length can rule certain people out of going for certain bikes – obviously, if the minimum and maximum parameters were too narrow, then fewer people would be able to ride the bike – so manufacturers try to offer a decent size range. How low the seat tube can go is important for people who want to do a lot of descending – most riders drop the seat post down for balance and comfort while flying downhill.
ℹ️ If it the seat tube doesn’t go low enough, it could mean the bike isn’t designed for aggressive descending or isn’t the right bike for your body mechanics.
Top Tube Length

The top tube length is the distance between the seat post and the handlebars; this is an important consideration for e-MTB handling. If you’re too hunched up between the seat and the handlebars, without much moving room, you won’t be able to handle the bike well.
The top tube length is a good barometer of how much manoeuvrability the mountain bike geometry will offer you – both for your legs coming up on the pedal strokes and for your arms to the handlebars.
Reach

Reach is the distance between the end of your seat to the handlebars – just slightly less in distance than top tube length. Reach is one of the key areas of mountain bike geometry which dictates how well you will be able to handle the bike and how comfortable you will feel.
If the reach is too long then you’re likely to feel very uncomfortable and it will put a lot of strain on your lower back and shoulders. You also won’t have full control over the bike’s handling.
A good amount of reach allows a slight bend in the elbow when gripping the handlebars, so you feel loose and comfortable – this allows you to manipulate the bike with ease and still feel stable. This is a very important aspect of mountain bike geometry.
Stack Height

Stack height is the distance between the middle of the bottom bracket, by the pedals, and the centre of the headtube, in the centre of the handlebars.
The stack height on an e-MTB can dictate your positioning on the bike – if the stack height is larger, then you’re more likely to be sitting back and upright while riding – providing a naturally more relaxed position.
If it’s shorter, you’re more likely to have a more aggressive, lower position on the bike, which maximises manoeuvrability.
ℹ️ A shorter stack height is often found on downhill mountain bikes, which need aggressive positioning and improved handling for technical terrain.
Down Tube Length

A bike down tube length is the distance between the bottom bracket, by your pedals, and the bottom of the headtube, by your handlebars.
The overall size of the bike is dictated by the downtube length and it plays an important role in also dictating the reach you will have to the handlebars.
A longer downtube can create more stability and a more grounded feeling, when combined with a larger wheel size. A shorter downtube is likely to lead to a more playful e-MTB that can be thrown around, with smaller wheels.
The downtube length can also contribute to the robustness of the bike – a longer downtube can add to the strength of the overall frame.
ℹ️ Aggressive bikes, such as downhill and enduro e-MTBs, often have longer, more robust down tubes, to be able to cope with the amount of punishment the bike is likely to face on descents.
Front Centre

Front centre mountain bike geometry is measured by looking at the distance of the bottom bracket, by the pedals, to the front axle, in the middle of the front wheel. A longer front centre allows a bike to take on more obstacles, lumps and bumps.
It means the rider is sitting back with a longer reach to the handlebars and gives a more planted feeling on the trail. A shorter front centre puts more weight forward onto the handlebars and means harsh braking and obstacles can’t be managed as smoothly.
ℹ️ Downhill and enduro bikes have longer front centres, to allow you to soak up the pressure of bumps and lumps on the trail, with your body weight planted to the seat. A longer front centre isn’t ideal for climbing ability though – as the weight is shifted to the rear of the bike, you get less front wheel traction uphill.
Chainstay Length

Chainstay length is the opposite of front centre – it’s the distance from the mountain bike bottom bracket to the back axle, in the middle of the back wheel. A longer chainstay improves overall stability, by providing a more grounded feeling and a better positioning.
A shorter chainstay tends to push your weight forward on a bike, which is good for traction and improved climbing ability. A short chainstay can also offer a more responsive riding experience, with the ability to manipulate from left to right more quickly.
Meanwhile, a longer chainstay distributes your weight to the rear of the bike and is good for descending. Chainstays are a hugely important feature of mountain bike geometry.
ℹ️ E-MTBs designed for lots of climbing often have shorter chainstays, such as general trail and some enduro bikes. Downhill bikes tend to have longer chainstays.
Wheelbase

The wheelbase measurement on an e-MTB is taken by looking at the distance between both axles, in the middle of the front and rear wheel. A longer wheelbase provides more stability out on the trail, by providing a larger surface area and the potential for a longer downtube.
A longer wheelbase brings greater traction, a much smoother riding experience and it makes the overall bike much stronger – which opens up the possibility of carrying larger weights and also cargo.
ℹ️ Cross-country bikes and touring bikes often have a longer wheelbase, compared to a shorter wheelbase on a general trail or enduro bike.
Head Tube Angle

The head angle is the angle between the headtube and front axle/ground. If there’s a steep angle, it’s likely to make the bike more playful and easier to manipulate, while a slacker head angle MTB will offer a lot more stability and a more grounded feeling.
You’re likely to find a steep head angle on a bike designed for tricky and technical terrain, with lots of sharp turning and fast-moving sections. A slacker head tube angle is likely to be found on downhill bikes, which need to take on more lumps and bumps and needing more stability on those gnarly descents.
ℹ️ E-MTBs often come with a slacker head tube angle to be able to factor in the extra weight at the rear of the bike, brought on by the battery and the motor. It needs to be more stable to cope with the weight.
Standover Height

This one explains itself – standover height is literally the distance between the top tube and ground as your stand over it. This is obviously important to ensure you can reach the floor and gain balance when stationary, but also important for your pedalling and balance. If you get the wrong standover height you can feel unstable while riding.
What’s a Good Geometry for a Mountain Bike?
There’s no good or bad geometry for a mountain bike – it all depends on the style of riding you’re wanting to do and your body mechanics. Each discipline of riding requires a different sort of geometry and you can certainly get good and bad geometry for different disciplines of MTBing and e-MTBing.
Downhill Mountain Bike Geometry
Downhill bikes have a slacker head tube angle, longer wheelbase and longer downtube – to provide stability out on the trail and offer a robustness. They also come with a lower bottom bracket, a longer chainstay and a longer reach. All of these create a planted feeling.
Enduro Mountain Bike Geometry
Enduro bikes have a slacker head tube angle and longer wheelbase, like a downhill base, but offer shorter chainstays for improved climbing prowess and manoeuvrability. They also have a steeper seat tube angle to improve their climbing efficiency, but have a longer reach to offer stability on the short sharp descents.
ℹ️ Trail bikes have similar geometry settings as enduro bikes, but aren’t quite as slack in certain areas, as they aren’t designed for terrain which is quite as gnarly.
Cross-Country Mountain Bike Geometry
Cross country bikes have a steeper head tube angle to provide responsive handling and a steeper seat tube angle to improve pedalling power and efficiency. The wheelbase and chainstays are also shorter to improve speed, agility and reduce traction.
Final Thoughts
Mountain bike geometry is hugely important. Every e-MTB has a different geometry, which is tailored to the discipline the bike is designed for. Riding a bike with the wrong geometry, in the wrong discipline, will be very uncomfortable – in some cases it will lead to crashes, injury and a thoroughly unpleasant day at the pedals.
Before you buy an e-MTB make sure you know the styles of riding you’re wanting to take on and use our comprehensive geometry guide to help point you in the right direction. Many manufacturers are now offering bikes with massive amounts of adjustable geometry, so you can tailor your bike to the needs of the day’s trails, to your body or to the particular race or terrain you’re taking on.
Now, take to the saddle (which you can make sure is positioned correctly by clicking here) and get peddling.